
THE IDEA BEHIND MONONODES
ABOUT ME
Hello, my name is Stefan Ringelschwandtner. I am a colorist / director / cinematographer based in Berlin.
I studied at the Offenbach Academy of Art and Design where I graduated in Film and Video in 2009.
THE IDEA BEHIND
REVERSE ENGINEERING THE GRADE
I remembered this blog post by Juan Melara from 2015. In the course of a discussion on the topic „movie look recreations“ in this “Lift Gamma Gain thread“, colorist and cinematographer Juan Melara „jumped in“ and recreated the look of “Midnight in Paris” in DaVinci Resolve.
The result is still one of the best look recreations you can find online. From this point on I got profoundly interested in the method „reverse engineering the grade“, and I started to experiment with it myself resulting in making this website on the topic with some additional points of views.
THE CHALLENGE
Juan Melara found similar images on Flickr matching location, angle and light conditions and converted those sRGB images to LOG and then graded the images. In this process he also researched the original print stock (Kodak 2383) and used a similar LUT in DaVinci Resolve for finishing.
Most of the look of a film is happening “in camera” / on set – through Production Design, Art Direction, Costume Design, Set Decoration – so I thought: Why not use actual “behind the scenes“ footage instead?
Behind the scenes footage is often taken by Video cameras, DSLRs, Smartphones, so the colors are different compared to the images captured by cinema cameras. But still, the production design, art direction, set decoration, cast, lighting, costume …it is all there.
I decided to watch a lot of “Behind the scenes”-material and collect stills that are similar to the scenes in the actual film.


Tenet (2020) / Directed by Christopher Nolan / © Warner Bros. Pictures
Little Women (2019) / Directed by Greta Gerwig / © Sony Pictures Releasing
MY APPROACH
FOR THE “FIRST 12”
For the “First 12” series, I take a slightly different approach than Juan Melara. I am starting right on with the grade. Without “video to log” conversion and without “Film print emulation”. As I mentioned before, the „Behind the scenes” footage is coming from different cameras, so even after conversion of the data to Arri LogC (as an example), the original image doesn’t come from an Arri. A color space transformation can be a very useful tool, but in this case, I don’t think it gives me any advantages. I skipped that part to simplify the process.
Same with “print film emulation”. There are many tools for “print film emulation” which are fantastic, but in my opinion, it sometimes leads to the misconception that people think a specific print stock is the “key” to a “cinematic image”.
I also figured: If I try to match a look, which was printed on film stock, my grade automatically ends up having some kind of “print stock aesthetic” look in it. So for this project I decided to go straight from „Image A“ (behind the scenes) to „Image B“ (final look).
MY NODE TREE
keep it simple, minimal and clean
(Use the minimum amount of controls to get to the look)
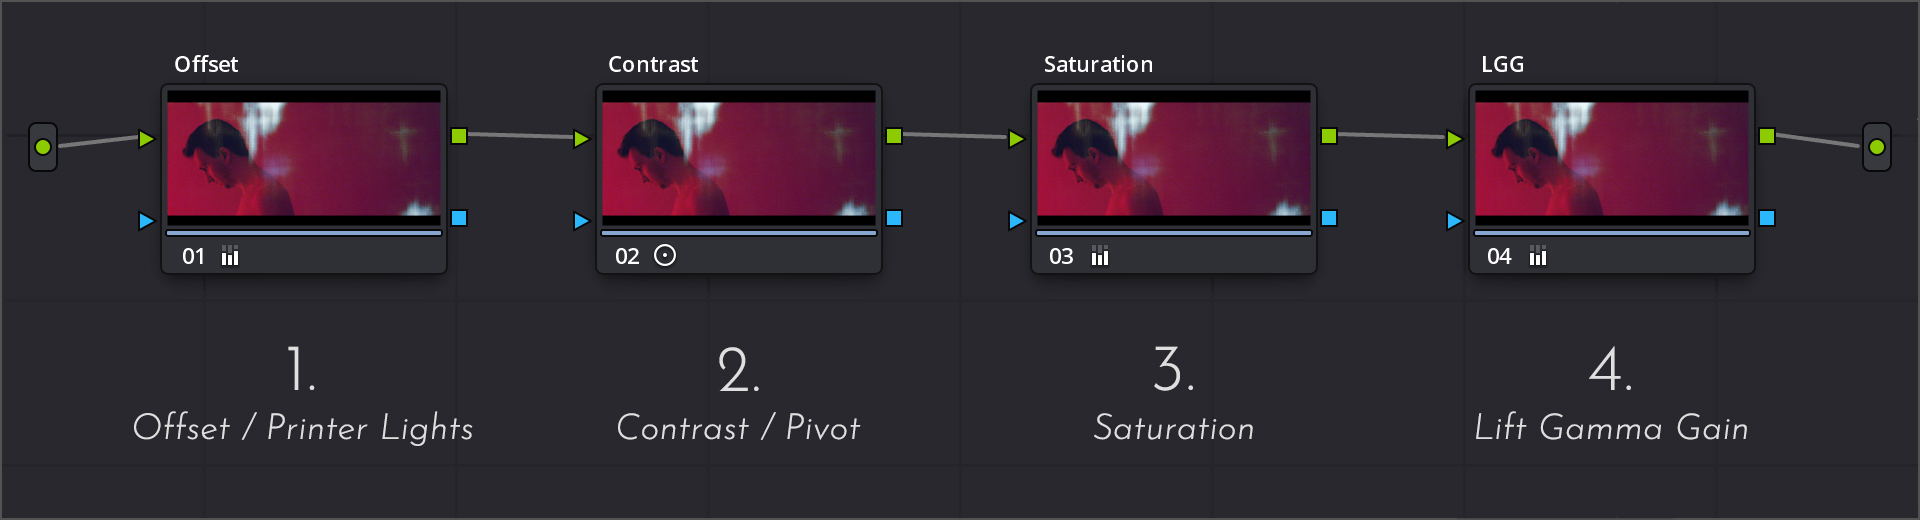
1.
Offset (Printer Lights)
To change the RGB Values and adjust the exposure.
2.
Contrast & Pivot
adjustment.
3.
Saturation – Add or
decrease saturation.
4.
LGG (Lift / Gamma / Gain)
To match shadows, midtones and highlights.
Sometimes I use additional Nodes.
You can find a detailed description
of the node tree here.
MY APPROACH
FOR THE “SOFT 2 STRIP” LOOK
For my latest project, I modified my node tree a little. I decided to build the “Soft 2 Strip” look around the popular Kodak 2383 LUT and start with a CST in Node 1 that transforms the “behind the scenes” images to “Cineon Film Log” first. From there I start reverse engineering the look. CLICK HERE to learn more about my “Soft 2 Strip” approach.

WHY I THINK THIS SITE
CAN BE HELPFUL
Over the last years I’ve seen more and more people trying to recreate popular film looks on YouTube / via Online Courses using all kinds of different approaches.
On one side, for example, there are teachers/creators who use 20 nodes and more, who go straight forward to qualifying the skin, creating Power Windows, applying Creative LUTs, creating 7 parallel mixer nodes, using another Qualifier for Highlights, switching to RGB Mixer for “final touches”, using plugins to “enable subtractive color manipulations”, changing key outputs and so on….
And on the other side, there are directors of photography & colorists who work on Hollywood productions that say things in interviews like: “We just reduced the blue a little and changed saturation and contrast, that’s all”. Or: “We were using a Print film emulation, balanced the shot and changed the offset (printer lights) a bit.”
With this website I want to reveal the discrepancy between different approaches and hopefully enrich the ongoing discussion about it with my own approach.
SUMMARY
This website is a place where you can watch, analyze and compare “behind the scenes” footage with stills from the final movie side by side. In my opinion, this alone can be helpful to understand that “the look” is not starting in post. Most of the look is happening in camera/on set, and color grading is a tool to complement it.
This website shows my personal approach to recreating a look. My goal is to get as close as possible to the final look of a movie, but at the same time I want to keep the node tree as minimal as possible. If some colors don’t match, that’s totally fine with me. Some grades might be a little “off” due to the data of the footage itself, others due to my choice not to tweak every detail to match perfectly.
See my offered PowerGrades as educational tools to learn more about color grading. Keep in mind that the Grades are based solely on the behind the scenes images that can be seen on this website.
VIDEO
YouTube: https://youtu.be/mt4FMClxhbc
Vimeo: https://vimeo.com/549665898
Have fun discovering the site.
If you have any questions / suggestions / comments, feel free to contact me anytime at stefanATmononodesDOTcom