
UTILITY DCTLS
ANALYSIS TOOL
INTRODUCTION
The “Utility DCTL” pack encompasses tools for image analysis and adjustment. It includes the “Balance DCTL” for analyzing skin tones in footage and managing color deviations, the “Clipping DCTL” for identifying and handling clipping in light or dark areas, and the “Isolator” features for color isolation in bright and dark regions, emphasizing ‘pure’ colors.
UPDATE – 2024-03-24
We’ve enriched the pack with four new LUTs. These LUTs are designed for seamless integration with Premiere, Final Cut, Photoshop, and other LUT-compatible software. While these LUTs mirror the capabilities of their DCTL counterparts, some differences exist due to LUTs’ inherent characteristics.

BALANCE
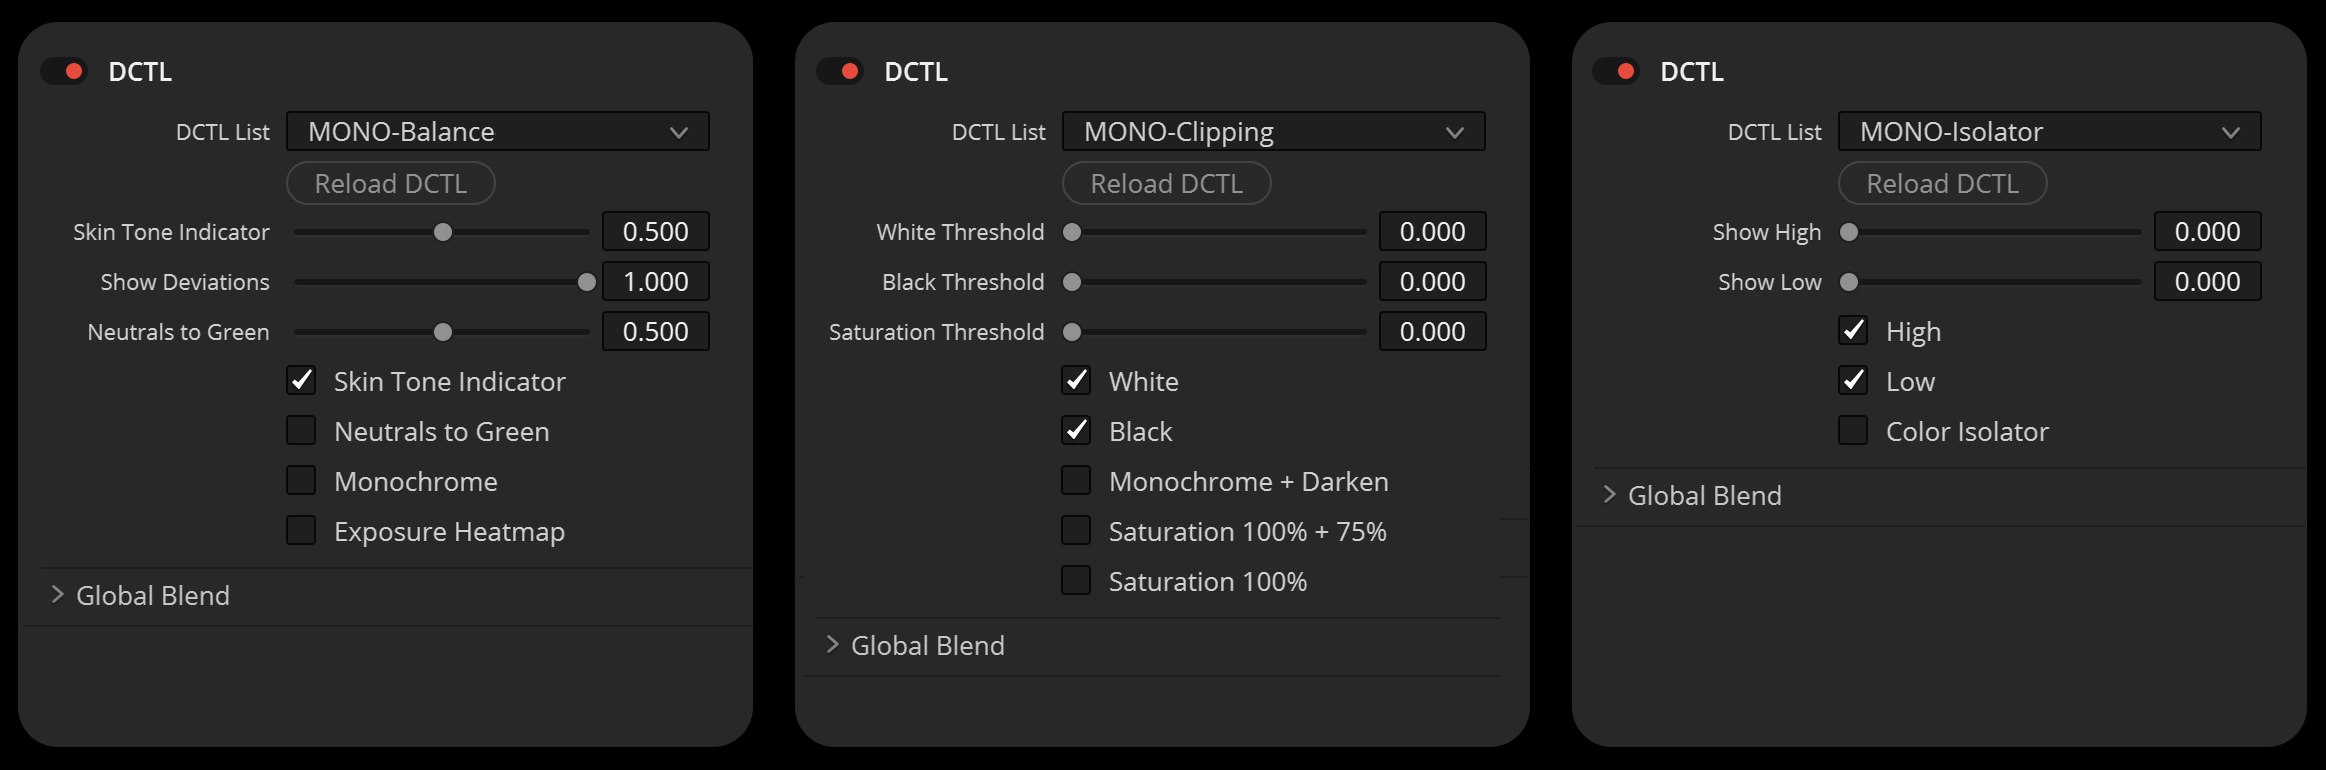
The “Balance DCTL” presents skin tones in footage as yellow, magenta, or green, depending on their deviation from the skin-tone line. The “Neutrals to Green” function turns neutral colors green, and the “Exposure Heatmap” function assists in adjusting the image’s exposure.
CLIPPING
The “Clipping DCTL” identifies when the image clips in light or dark areas. The “Darken” function is particularly valuable as it darkens the image except for the clipping part, which remains bright red, thus simplifying the clipping check process.
ISOLATOR
The “Show Low” and “Show High” sliders allow for isolation of colors in bright and dark areas. The “Color Isolator” function equalizes brightness into neutral gray, emphasizing ‘pure’ colors.
SKIN TONE INDICATOR
The advantage of using the DCTL is that it simplifies the color correction process. You don’t need to switch to the COLOR PICKER tool, or move it over the face to analyze each region.There’s no need to draw a circle with a mask to isolate the skin region. It’s eliminating the need to check the scopes for analysis. By activating the DCTL, you immediately see which areas on the face align with the SKIN TONE line and which areas shift more towards magenta or green. The “Skin Tone Indicator” slider enables you to set the range that turns skin color into yellow,


ALSO, GREAT FOR
ANALYZING FILMSTILLS

Dunkirk (2017) / Directed by Christopher Nolan / © Warner Bros. Pictures

Glass Onion: A Knives Out Mystery (2019) / Directed by Rian Johnson / © Netflix
Phantom Thread (2017) / Directed by Paul Thomas Anderson / © Universal Pictures (International)
Dunkirk (2017) / Directed by Christopher Nolan / © Warner Bros. Pictures

Battle of the Sexes (2017) / Directed by Valerie Faris & Jonathan Dayton / © Fox Searchlight Pictures
Nope (2022) / Directec by Jordan Peele / © by Universal Pictures
Blonde (2022) / Directed by Andrew Dominik / © Netflix
NEUTRALS TO GREEN
The “Neutrals to Green” button in the DCTL tool is designed to facilitate color balancing in DaVinci Resolve. When activated, this function identifies colors within an image where the RGB values are similar, signaling a neutral tone, and converts those colors to green. By isolating these areas, it simplifies the process of adjusting color balance within a shot, allowing for more precise control and consistency.

EXPOSURE HEATMAP
The Exposure Heatmap employs a false color system to represent different exposure levels. Overexposed images shift towards warmer yellow and red tones, indicating areas that may be excessively bright. Conversely, underexposed areas adopt cooler tones of green, blue, and violet, signifying sections of the image that are overly dark.
Central to this tool is the visualization of mid-grey, a crucial reference point in exposure measurement, especially for skin tones. Mid-grey represents the average or balanced exposure in an image, and skin tones typically fall within this range. By accurately identifying and adjusting mid-grey, filmmakers and colorists can ensure that skin tones, often the focus in visual storytelling, are rendered with naturalistic and consistent exposure.
Drawing inspiration from the EL (Exposure Latitude) Zone System, developed by renowned cinematographer Ed Lachman, ASC, this tool offers an intuitive, user-friendly interface for exposure correction. Incorporating mid grey and skin tone visualization, the Exposure Heatmap extends its utility, making it an indispensable tool for achieving realistic and aesthetically pleasing skin tones.
Display-based Operation: The “Exposure Heatmap” is designed for post-production use, analyzing and visualizing exposure levels on a display. It is not integrated into a camera but is used after the image capture process, making it versatile for various post-production workflows.
Display-referred Exposure Analysis: Unlike tools that analyze exposure based on the scene being captured, the “Exposure Heatmap” works with the final image as it appears on a display.
Approximate Exposure Representation: The tool does not rely on precise exposure stops due to the variability of the original material’s exposure levels. Instead, it provides an approximate representation of exposure values, using intuitive color coding to indicate over- and under-exposed areas.


CLIPPING

The “white threshold” and “black threshold” sliders are instrumental in fine-tuning the clipping levels of the bright and dark areas in the footage.
The “monochrome” button provides the capability to convert the image into grayscale. The advantage of this feature is that it simplifies the process of identifying clipping issues when using vectorscopes. By transforming the image to black and white, the red indicator signifying clipping becomes more noticeable.
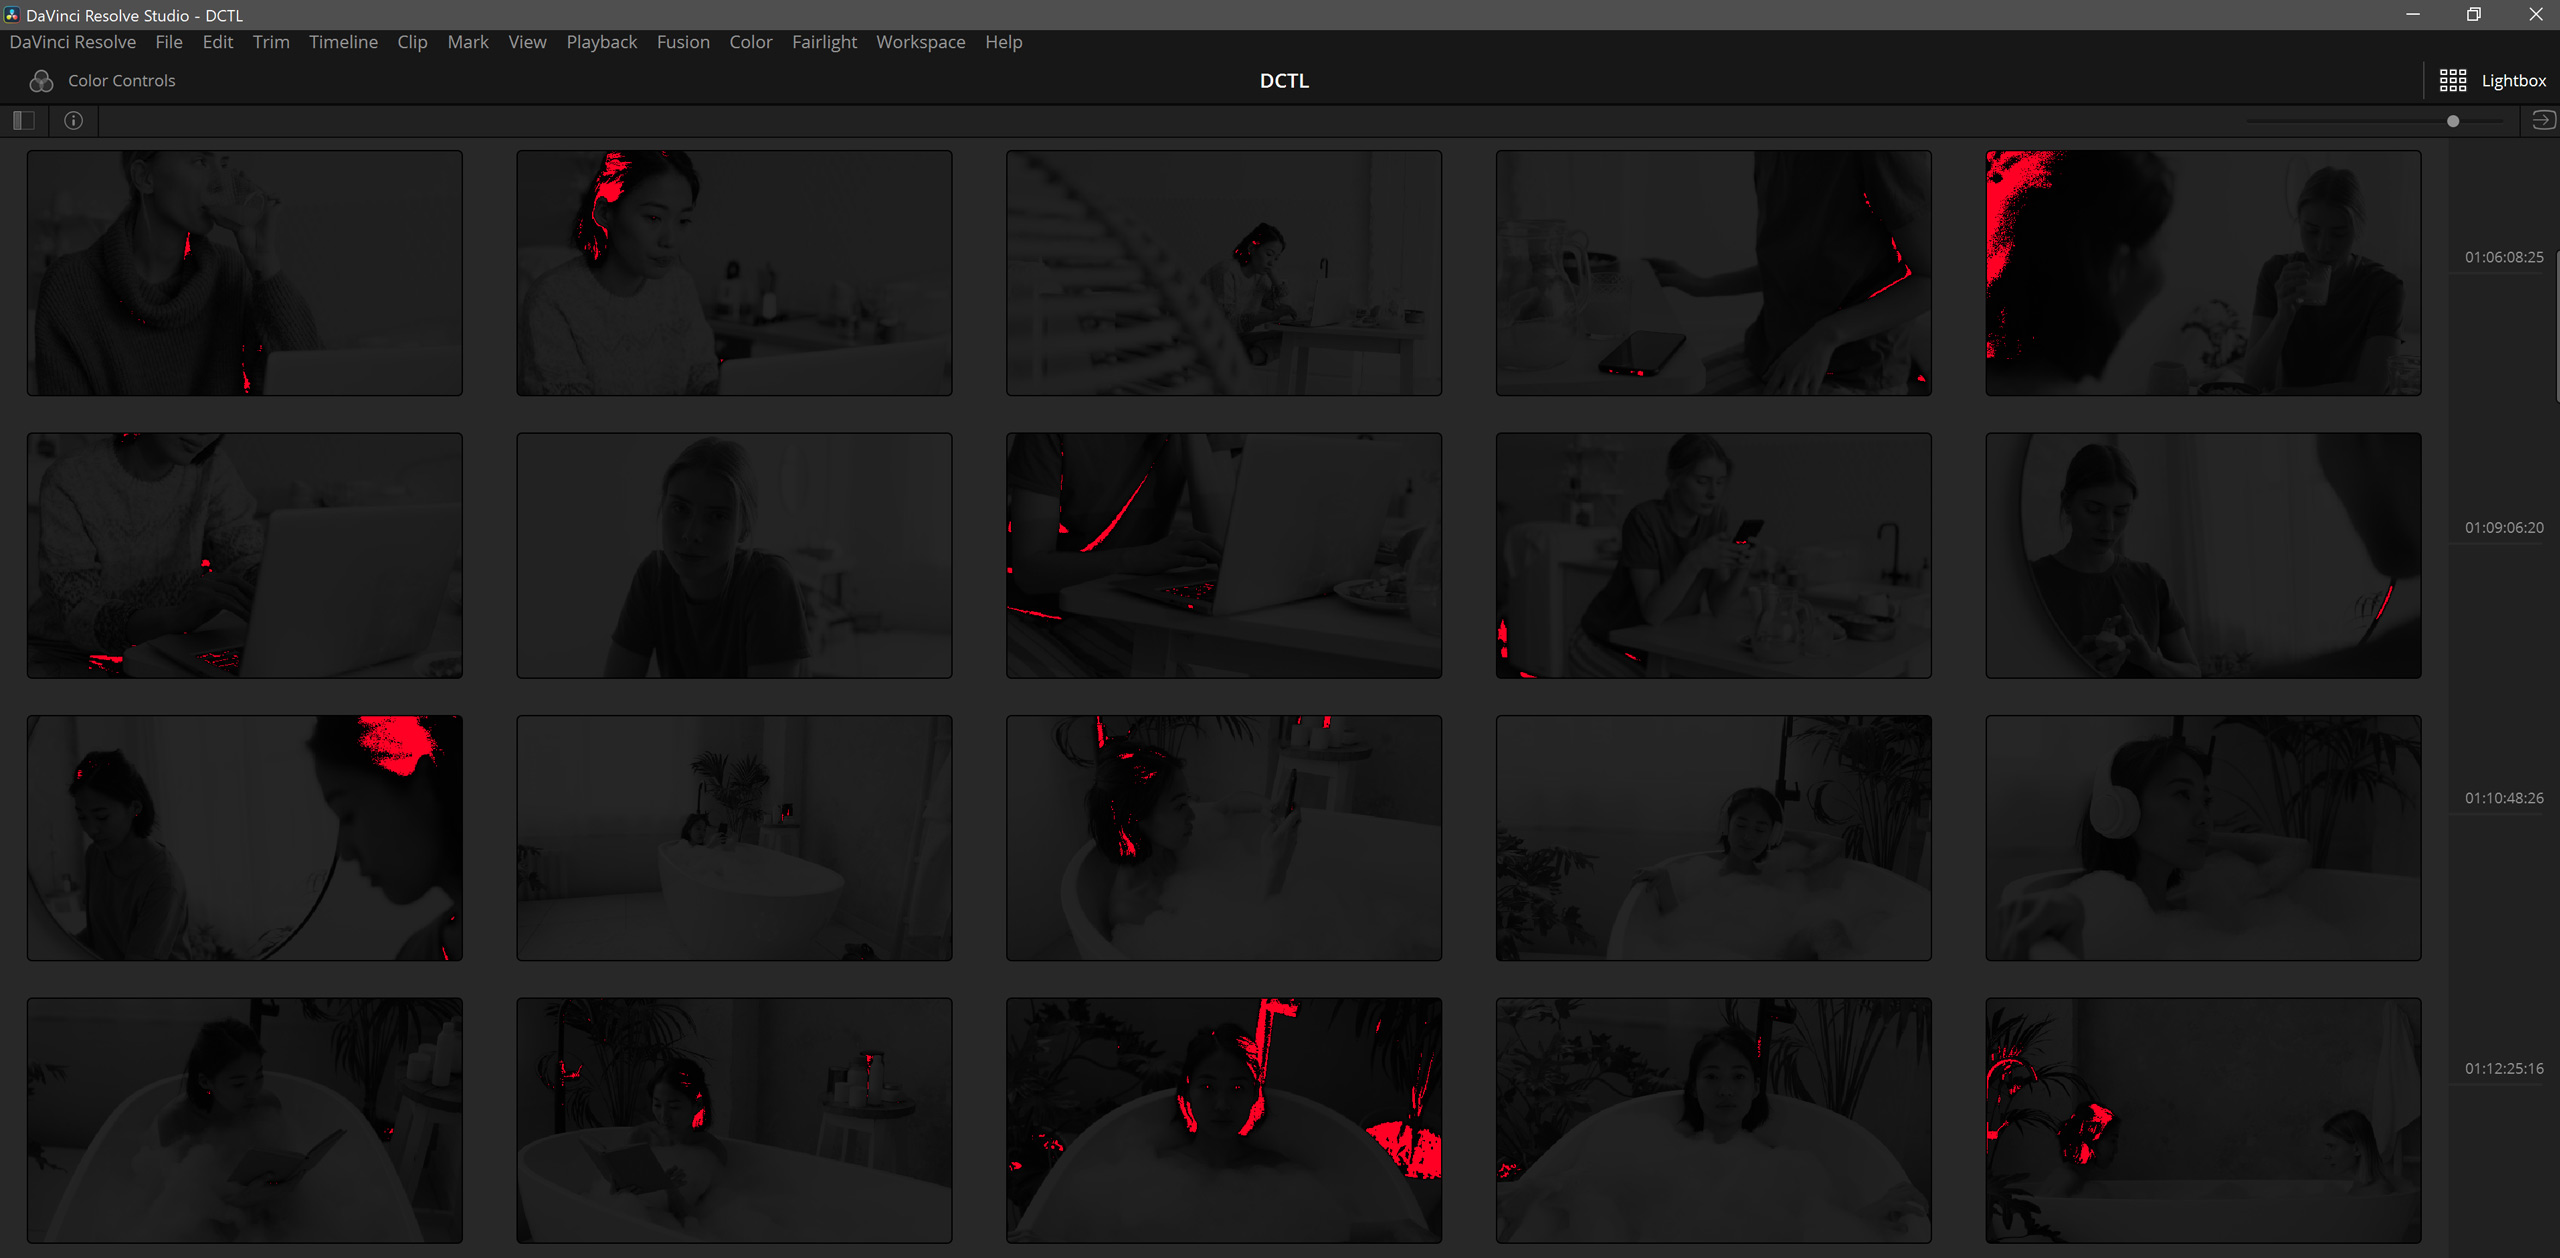
Moreover, I’ve added a “darken” button into this DCTL script. This button not only transforms the image to black and white, but also dramatically reduces the overall brightness of the image, rendering it almost entirely black. When used in conjunction with the Lightbox tool in DaVinci Resolve, the “red clipping” becomes remarkably prominent, making it easier to spot the areas of the footage that require adjustment.

CLIPPING
MONOCHROME & DARKEN
LIGHTBOX
In this example here, you can see the integration of the “darken” feature. This feature modifies the image into grayscale and substantially dims it. When utilized with DaVinci Resolve’s Lightbox tool, red clipping becomes exceptionally prominent, simplifying the pinpointing of footage areas requiring adjustments.
ISOLATOR

SHOW HIGH
The “Show High” feature is a powerful tool that isolates colors in the highlights of your footage, enabling focused and precise vectorscope analysis. It functions by converting all other colors that don’t fall within the defined bright area into shades of grey. This selective color isolation facilitates an in-depth examination of the color values in the brighter parts of your image, without interference from other color ranges.
SHOW LOW
The “Show Low” feature concentrates on revealing the colors within the shadows or darker sections of your footage. Any colors not encapsulated within this predefined low-light spectrum are rendered as grey. This functionality paves the way for a detailed exploration of color values in shadow areas, undisturbed by the presence of colors from brighter sections of your footage.
COLOR ISOLATOR

NODE TREE
COLOR SPACE

VIDEO
FREE DEMO

UTILITY PACK UPDATE
LUTs Included

balance.cube
LUT
33x33x33
neutrals-to-green.cube
LUT
33x33x33
heatmap.cube
LUT
33x33x33
clipping.cube
LUT
33x33x33
DCTL vs. LUT

On the left side, with the DCTL application, there are clearer lines between the yellow and green areas. The right side shows the LUT, where the transition between yellow and green is less distinct. Because LUTs rely on a set of fixed points and interpolate between these points, the transitions between colors are not as sharp as with the DCTL.
BUY
-
 € 59,00
incl. 19% VAT