MIDDLE GRAY
DCTL

INTRODUCTION
In color grading, mid-gray serves as a crucial reference point that simplifies contrast adjustments and minimizes the need for constant tweaks. By setting mid-gray correctly, colorists can achieve a balanced look with greater ease and consistency. Here’s how mid-gray can streamline your color grading workflow and improve the end result.
Description of a Middle Gray Card
A middle gray card is a flat, matte card that reflects 18% of the light that hits it, representing a neutral gray tone halfway between pure black and pure white. It’s commonly used in photography and cinematography as a reference point for exposure and color balance.
Mid-Gray as a Foundation for Contrast
Using mid-gray as a reference point allows for smooth and balanced adjustments across all tonal ranges. By setting the contrast pivot to match the mid-gray level specific to your color space (e.g., 0.336 in DaVinci Intermediate), contrast changes affect the image more evenly. This approach keeps shadows and highlights consistent, making contrast adjustments more effective and less disruptive. With the correct mid-gray setting, you can adjust contrast without needing to constantly rebalance exposure, saving time and maintaining consistency.
Collaborating with the Director of Photography
The Director of Photography (DP) establishes the visual foundation by setting exposure based on the scene’s lighting and the subjects’ skin tones, often using an 18% gray card. This practice ensures that mid-gray is accurately captured within the camera’s color space, providing a consistent baseline for color grading. Aligning your mid-gray settings with the DP’s exposure choices helps maintain the intended look of the film, ensuring natural and consistent skin tones and other critical elements throughout.
Enhancing Workflow Efficiency
A stable mid-gray reference reduces the need for adjustments across different shots. When mid-gray is properly established, contrast adjustments won’t unintentionally shift exposure, eliminating the need to tweak each shot individually. This consistency allows you to apply contrast and stylistic settings across your entire timeline without extra corrective work. Starting each shot with a consistent baseline simplifies adjustments, making the grading process quicker and more straightforward. This lets you focus on creative decisions rather than repetitive corrections, improving both the efficiency and quality of your final film.

MIDDLE GRAY
DCTL
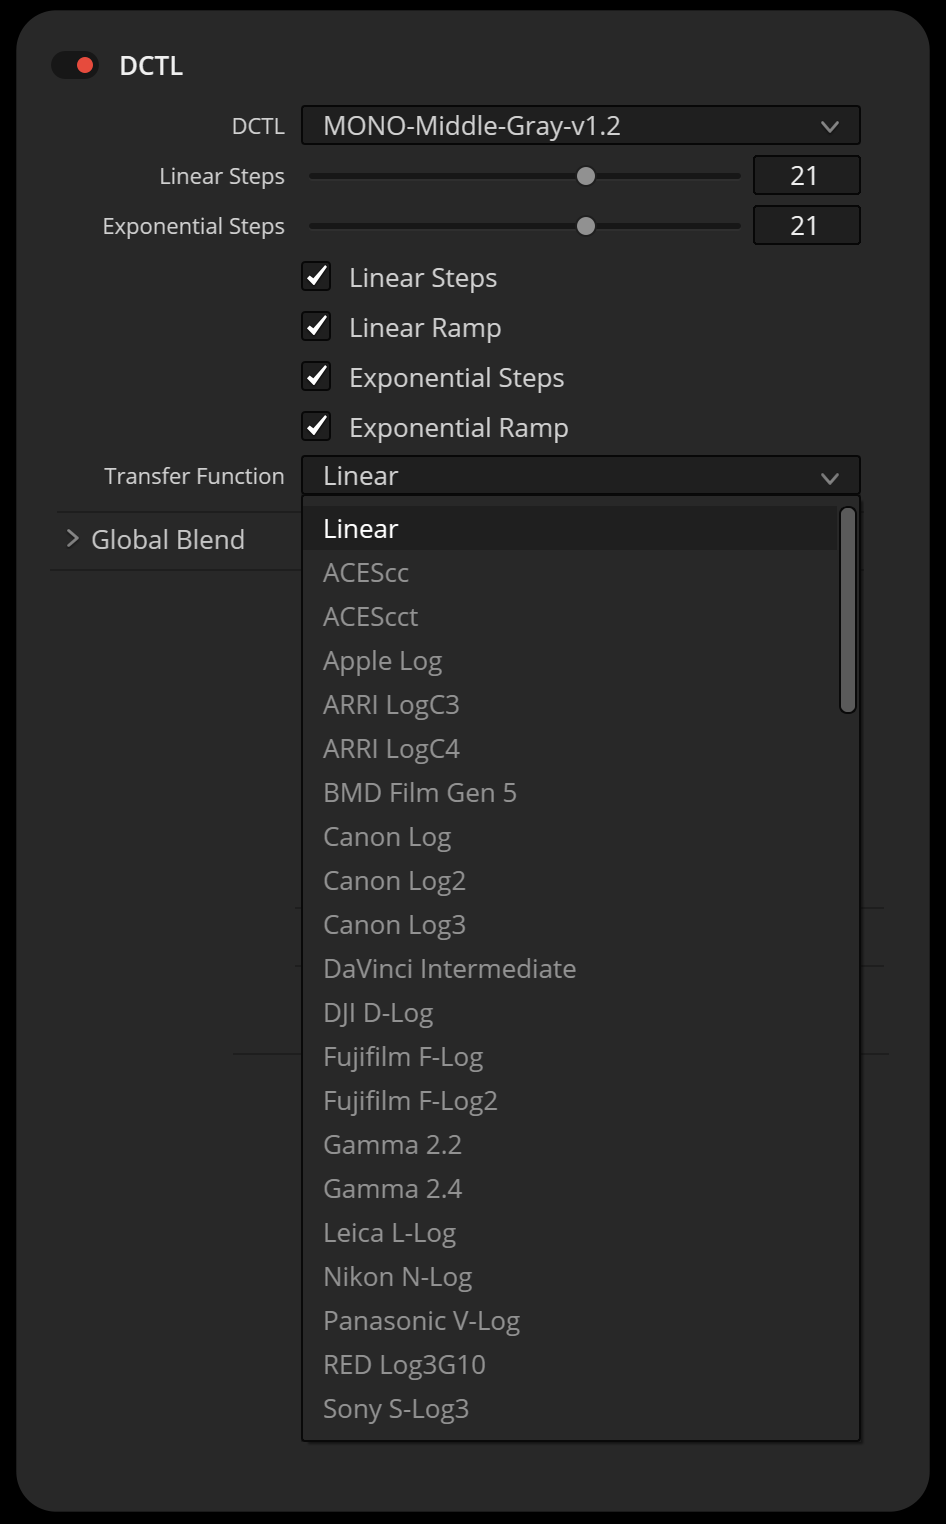
Linear Steps: Defines exposure chips in a linear progression, doubling each chip’s code value to place middle gray in the center.
Linear Ramp: Provides a 0-1 linear exposure gradient.
Exponential Steps: Creates an exponential progression, emphasizing stops around middle gray.
Exponential Ramp: Adds an exponential exposure gradient.
Transfer Function: Allows selection of a transfer function (e.g., DaVinci Intermediate, ACEScc, ARRI LogC3) to apply tonal mapping.
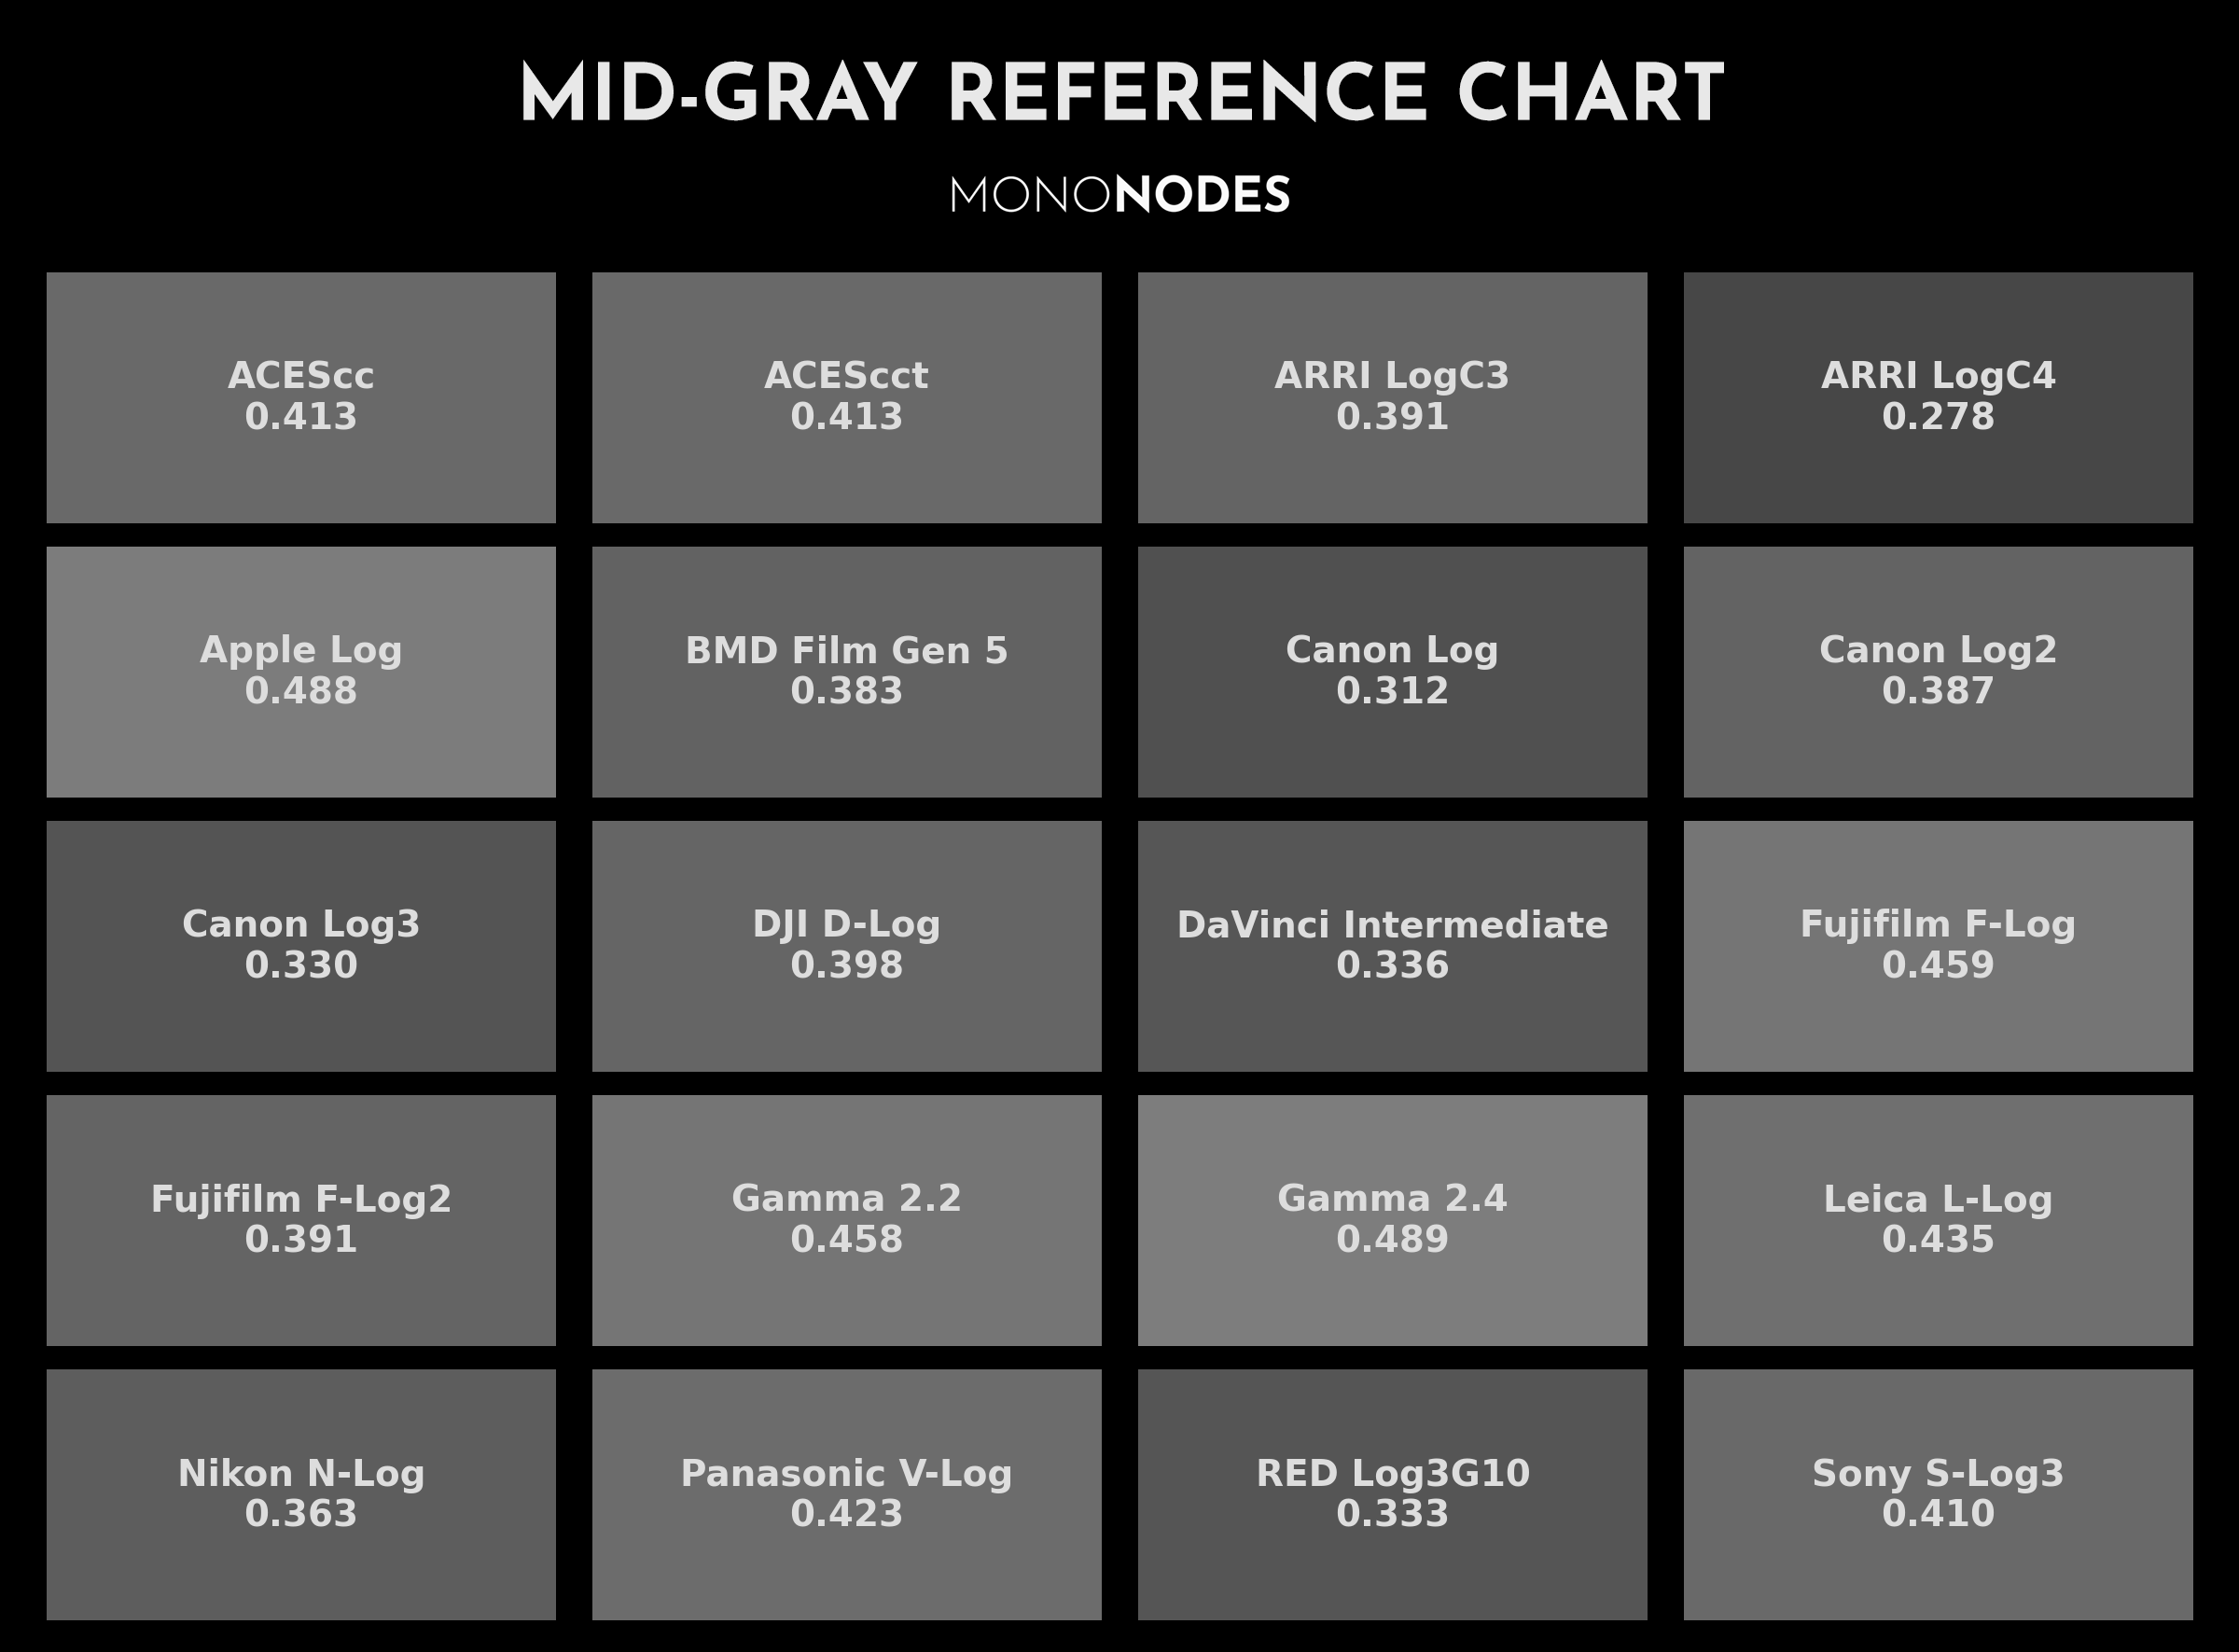
MID-GRAY REFERENCE GUIDE
| Transfer Function | MID Gray IRE |
|---|---|
| Linear | 0.180 |
| ACEScc | 0.413 |
| ACEScct | 0.413 |
| Apple Log | 0.488 |
| ARRI LogC3 | 0.391 |
| ARRI LogC4 | 0.278 |
| BMD Film Gen 5 | 0.383 |
| Canon Log | 0.312 |
| Canon Log2 | 0.387 |
| Canon Log3 | 0.330 |
| DaVinci Intermediate | 0.336 |
| DJI D-Log | 0.398 |
| Fujifilm F-Log | 0.459 |
| Fujifilm F-Log2 | 0.391 |
| Gamma 2.2 | 0.458 |
| Gamma 2.4 | 0.489 |
| Leica L-Log | 0.435 |
| Nikon N-Log | 0.363 |
| Panasonic V-Log | 0.423 |
| RED Log3G10 | 0.333 |
| Sony S-Log3 | 0.410 |
FAQ
What if I switch from ARRI LogC3 footage to DaVinci Wide Gamut / Intermediate using a CST – should I use the middle gray value for ARRI LogC3 or for DaVinci Wide Gamut Intermediate when grading?
Once you convert your footage from ARRI LogC3 to DaVinci Wide Gamut / DaVinci Intermediate using a Color Space Transform (CST), all grading operations in nodes after the CST are interpreted according to the target color space—in this case, DWG/Intermediate. That means you should reference the middle gray value of the target color space (DWG/Intermediate), not the source. Specifically:
– ARRI LogC3 middle gray: 0.391
– DaVinci Intermediate middle gray: 0.336 ← Use this one
This is because the CST remaps tonal values—including middle gray—into the new encoding defined by the target gamma curve and color primaries. Any contrast, exposure, or pivot-based adjustments should be calibrated according to the current working space to ensure accurate tonal control.
VIDEO
DOWNLOAD
MIDDLE GRAY DCTL
ko-fi.com / 30 KB
Version 1.4 – March 28, 2025
- Fixed: Corrected behavior of the Linear Ramp. Previously, enabling “Steps” inadvertently caused the Linear Ramp to switch to step mode. This issue has been resolved, ensuring the Linear Ramp maintains its smooth gradient regardless of the Steps setting.
Version 1.2 – March 20, 2025
- Enhanced: Added additional log transfer functions.
- Updated: The DCTL now displays numeric mid-gray exposure values directly on-screen
Learn More About Middle Gray (18% Gray)
To deepen your understanding of Middle Gray and its role in color grading, watch the videos below:
What is this thing called Middle Gray?
by Filmmaker IQ
YouTube: https://www.youtube.com/watch?v=0RbudPe7pp8
Walter Volpatto – Node Structure in Davinci Resolve
by Gus Sanchez Colorist
YouTube: https://youtu.be/ymr4wyo7GcA?si=460a5MyJ6U6Sa1Cw&t=3670
You don’t know middle gray like this (but you should)
by Cullen Kelly
YouTube: https://www.youtube.com/watch?v=yjyUdiCOvkg
The #1 color grading tool that’s not a knob in DaVinci Resolve
by Cullen Kelly
YouTube: https://www.youtube.com/watch?v=qljAIRY9Gpc
ADDITIONAL FREE
DCTL TOOLS

CLAMP
The tool is aimed at managing extended color values, providing functionality to clamp or limit color values to ensure they stay within a specified range, which is particularly useful when working with colors that fall outside the standard range.
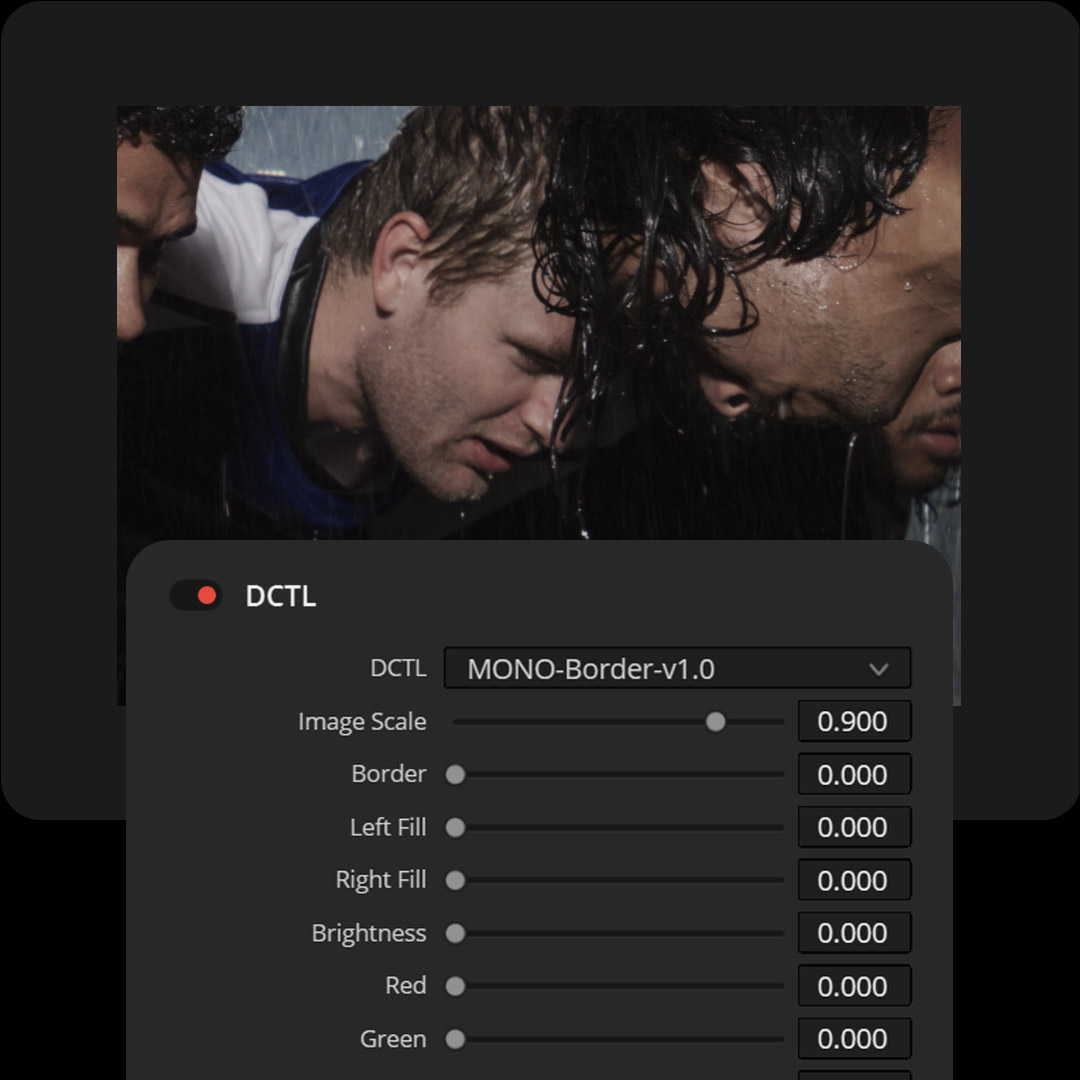
BORDER
This DCTL shrinks your image, adds a customizable border, and allows you to place your footage against a neutral or colored background.