
LOOK / LAB / PRINT
v3.0
DCTLS
MONO
LAB
MONO
LOOK
MONO
PRINTER LIGHTS
MONO
LOOK
DCTL
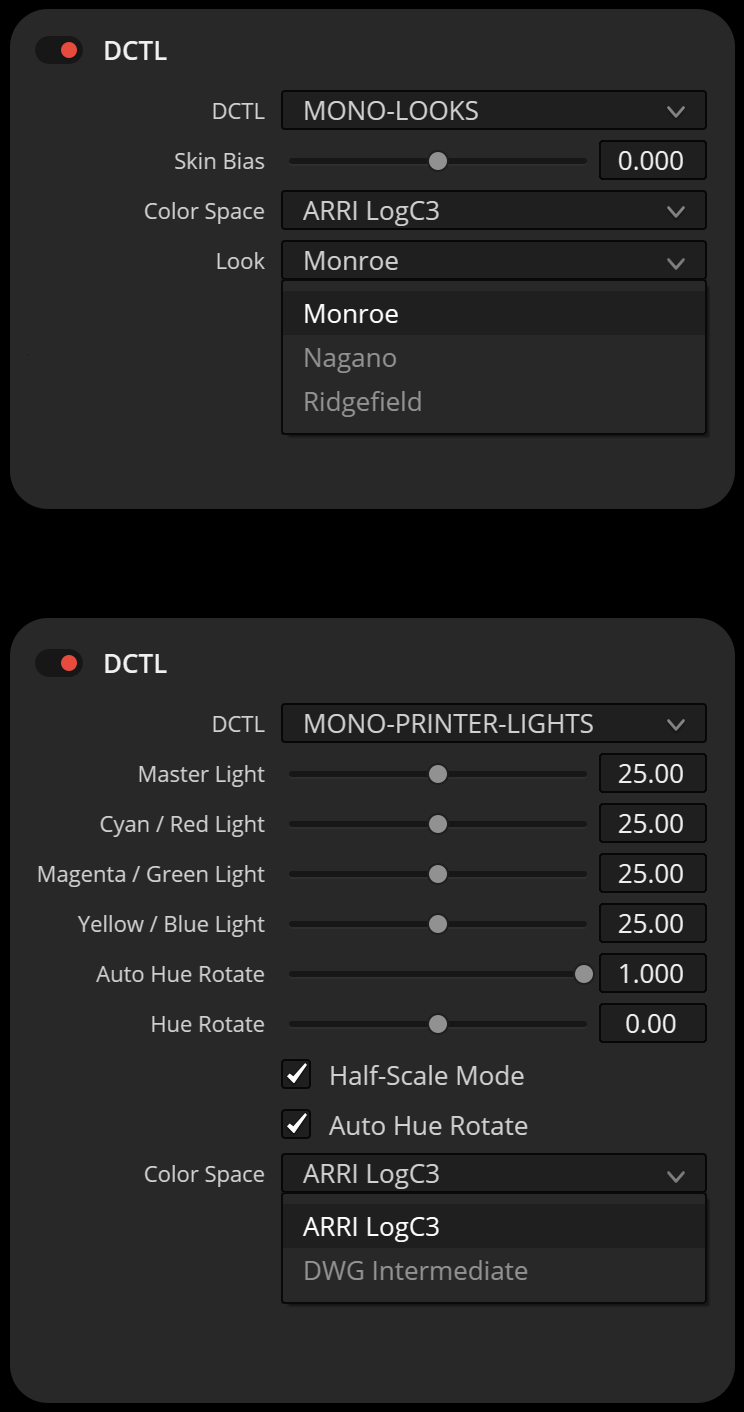
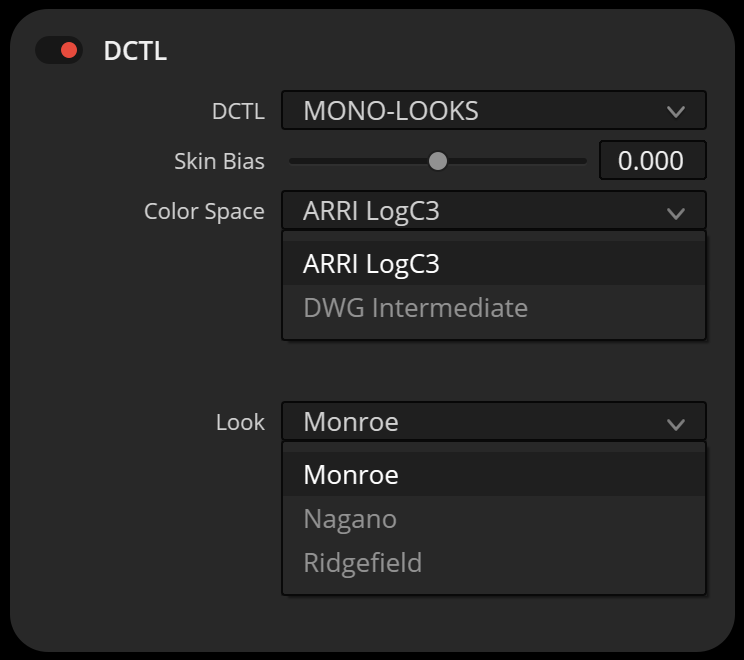
The MONO-LOOK DCTLs are inspired by the classic aesthetics of Kodak and Fuji film. This pack includes three carefully designed negative film emulations, each capturing the unique color characteristics of analog film.
My goal in developing this tool was to closely replicate the essence of film without being rigidly bound by it. I focused on recreating film’s most appealing characteristics while maintaining flexibility, allowing users to refine and shape the look further during grading. Each look is built on a foundation of 40 finely tuned parameters.
While the MONO-LOOK DCTLs are designed to work without extensive adjustments, they include a single “Skin Bias” slider. This allows for subtle fine-tuning of skin tones, shifting them slightly toward magenta or green based on user preference.
MONROE
MONROE is inspired by the distinctive character of classic film. The name Monroe comes from a district in Rochester, New York, home to Kodak’s headquarters.
NAGANO
NAGANO takes its name from a region in Japan known for its natural beauty and traditions. It is located near Tokyo, where Fuji’s headquarters is in Akasaka, Minato.
RIDGEFIELD
RIDGEFIELD is inspired by the scenic surroundings of Rochester, home to Kodak’s headquarters.
LAB
DCTL
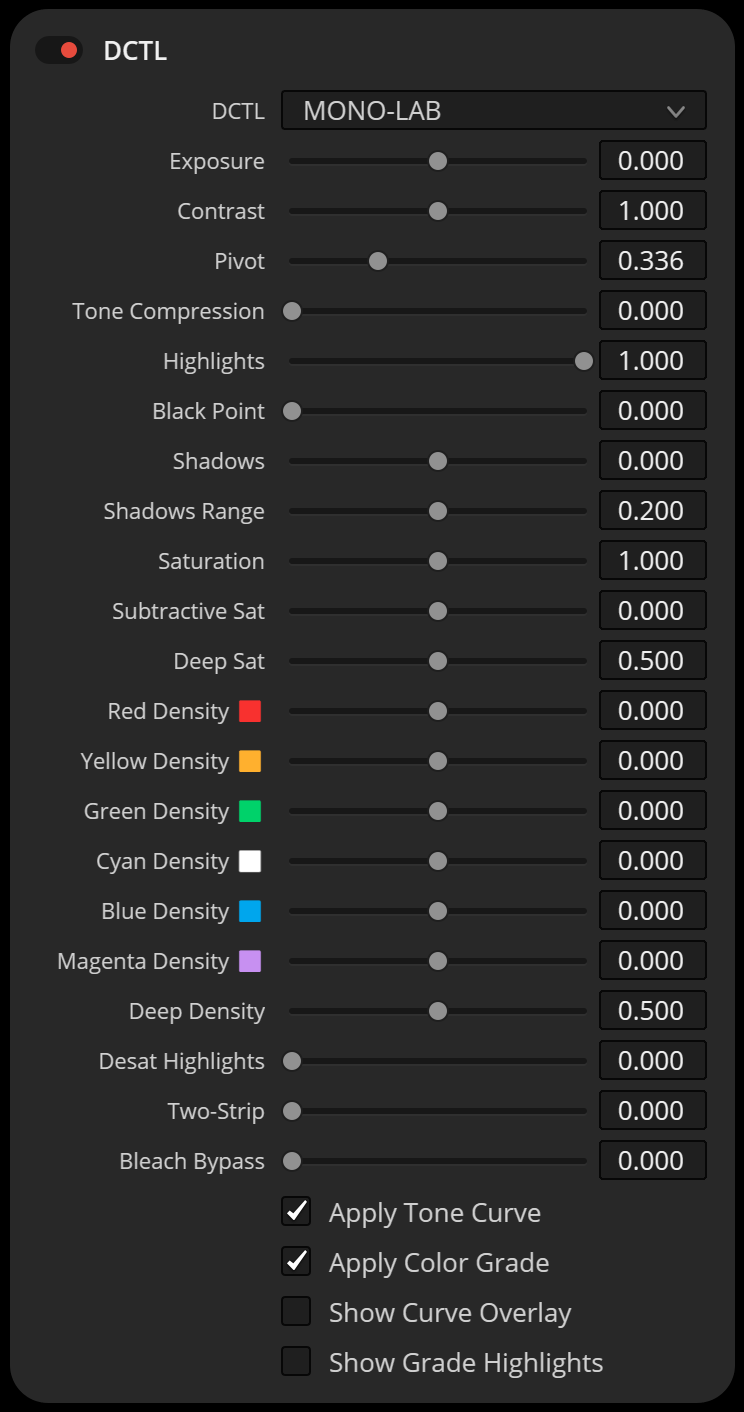
The “MONOLAB DCTL” allows users to precisely fine-tune the look of their footage, providing detailed control over color grading for a more refined and personalized visual aesthetic.
The Exposure slider functions identically to the Exposure control in the HDR grading wheels.
The “LAB” DCTL is currently available for both ARRI Alexa LogC3 and DaVinci Wide Gamut Intermediate (DWG)
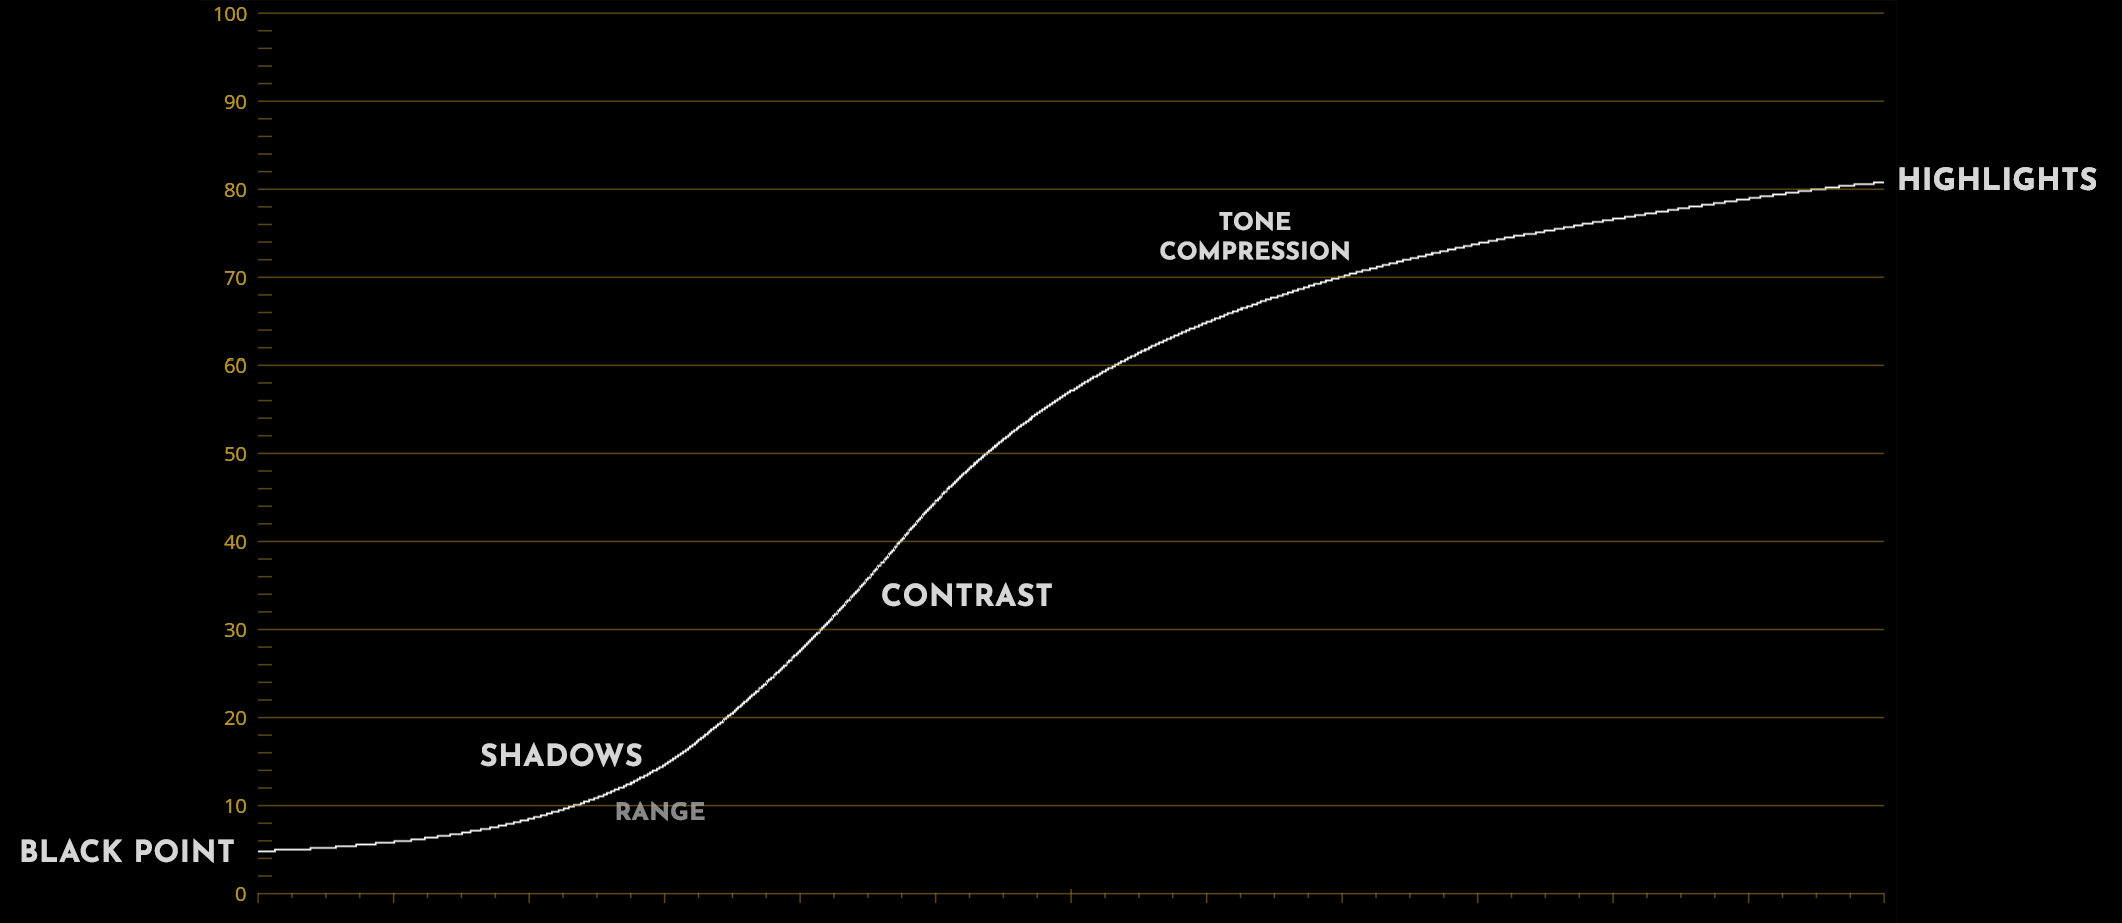
FILMIC CONTRAST
Contrast & Pivot
These work in tandem to shift tones around a chosen anchor, letting you intensify or soften the overall image balance.
Shadows & Shadow Range
These sliders refine darker areas without losing important detail, offering nuanced control over the low end.
Black Point
Sets the darkest threshold, allowing you to anchor deep blacks or introduce a subtle lift.
Highlights
Manages how bright details roll off at the top, preventing overly harsh transitions into white.
Tone Compression
This process selectively reduces contrast in the brightest areas, smoothly rolling off highlights without clipping or flattening the image. The pivot value ensures midtones remain stable, allowing only the upper range to be compressed into a softer, more filmic curve.

SUBTRACTIVE
SATURATION
& DENSITY
Subtractive Sat
This tool adjusts hue values through subtractive color adjustments.
Deep Sat
Excludes the brightest portions of the image from the subtractive saturation effect.
RGBCMY Density
Individually adjust the brightness of Red, Green, Blue, Cyan, Magenta, and Yellow, allowing you to lighten or darken specific hues with fine control.
Deep Density
Limits the impact of the density sliders on highlights, allowing you to focus density adjustments primarily on midtones and darker regions without affecting brighter details.
DESAT HIGHLIGHTS
In negative film processing, highlights can exhibit a unique quality where intense light results in lower saturation, a feature that digital sensors don’t naturally replicate. This quality contributes to what many describe as a “filmic” look, which is often sought after in digital color grading to emulate the aesthetic qualities of traditional film. The Desat Highlights Slider is designed to mimic this aspect of film behavior, allowing digital footage to achieve a similar aesthetic quality. By desaturating highlights, it helps in creating an image that resonates with the soft, natural feel typical of film imagery.


TWO STRIP
The Two-Strip Technicolor process was an early color film technique that used red and green filters to create its signature look. Our Two-Strip slider lets you apply this effect to your digital films, adjusting the intensity of those classic tones for an authentic vintage feel.
BLEACH BYPASS
Bleach Bypass is a film processing method that skips the bleaching step, leaving silver in the emulsion. This reduces color saturation while boosting contrast, creating a gritty, high-impact look often used for dramatic effect.
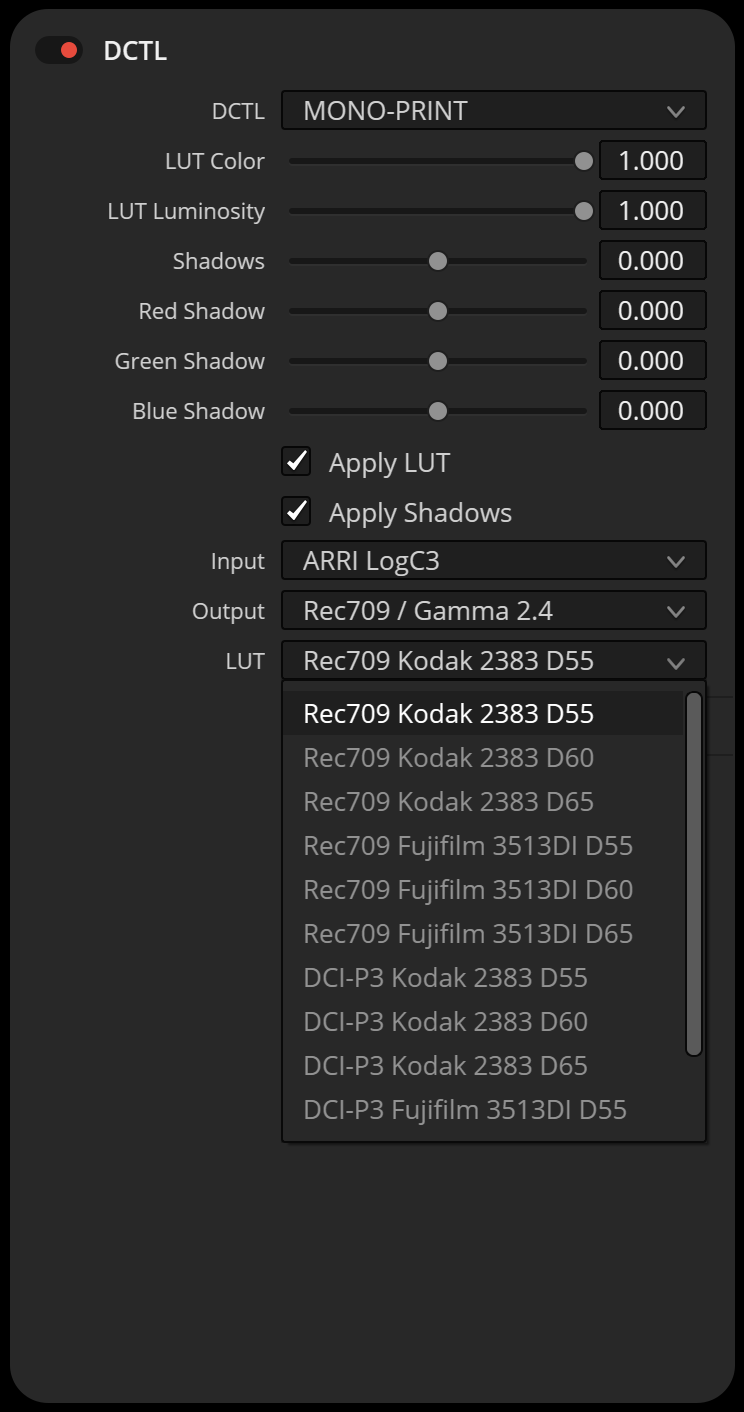
DCTL
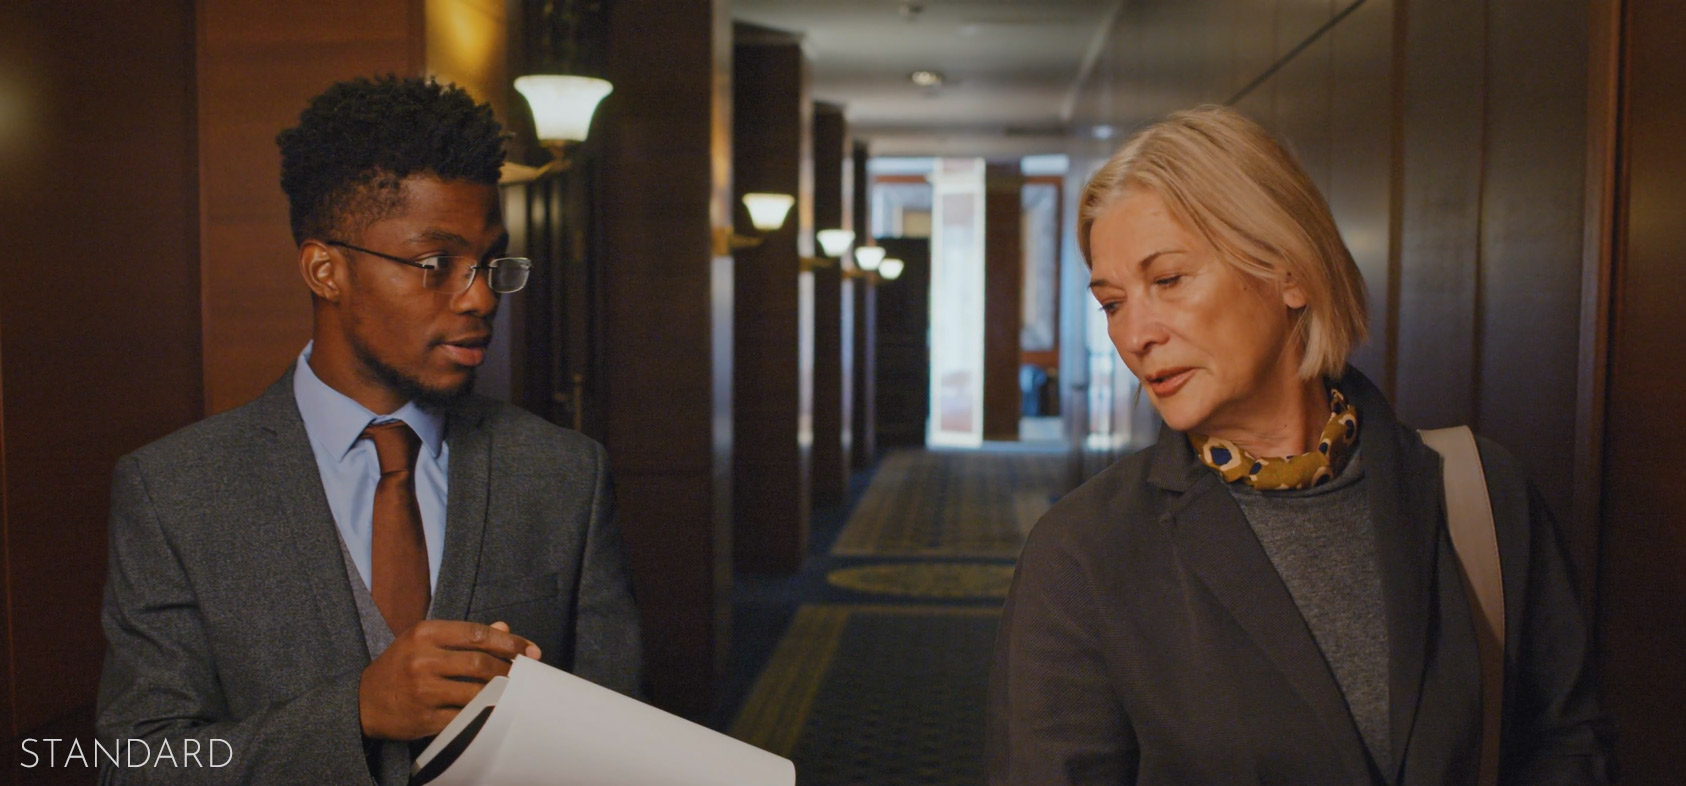
The PRINT DCTL performs a color space transform from either ARRI LogC3 or DaVinci Wide Gamut Intermediate (DWG) to standard display spaces like Rec.709 / Gamma 2.4 or DCI-P3. It includes built-in tone mapping and gamut compression to ensure a smooth and accurate conversion.
Optionally, you can apply a film print LUT and blend it with DaVinci Resolve’s built-in Kodak 2383 LUTs to achieve a stylized film look. The DCTL lets you separate the LUT’s Color and Luminosity components, giving you more precise control over the final image.
Film print LUTs often lift the shadows slightly. This DCTL provides global and per-channel shadow adjustments, allowing you to deepen the blacks, neutralize unwanted color casts, or add a subtle tint to the shadows as needed.


COLOR
This setting affects only the image’s colors, adjusting hues, saturation, and color balance without influencing brightness or contrast.
COLOR & LUMINOSITY
Setting both the Color and Luminosity sliders to 100% applies the LUT in its entirety, without separating its components.
LUMINOSITY
This setting impacts the image’s brightness and contrast, adjusting lightness and darkness without altering colors.
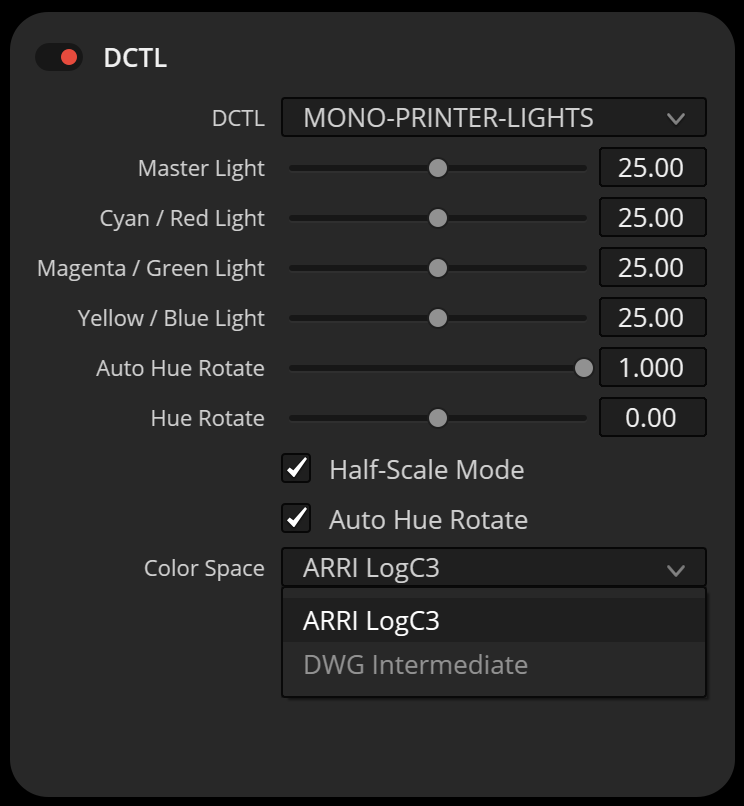
PRINTER LIGHTS
DCTL
Master Light
Simulates raising or lowering all printer lights equally.
Auto Hue Rotate
Auto Hue Rotate is still a global hue rotation, similar to the regular Hue control in DaVinci Resolve.
It automatically calculates a hue rotation angle based on your printer light adjustments, and applies that rotation globally. The goal is to help keep skin tones closer to the skin tone line.
It’s rotating hue around the neutral axis (the line between black and white), not isolating or tracking skin tones directly.
Hue Rotate
Additional global hue rotation. Useful for correcting tone shifts or for creative grading.
Half-Scale Mode
Reduces the strength of the printer light controls for finer, more precise adjustments
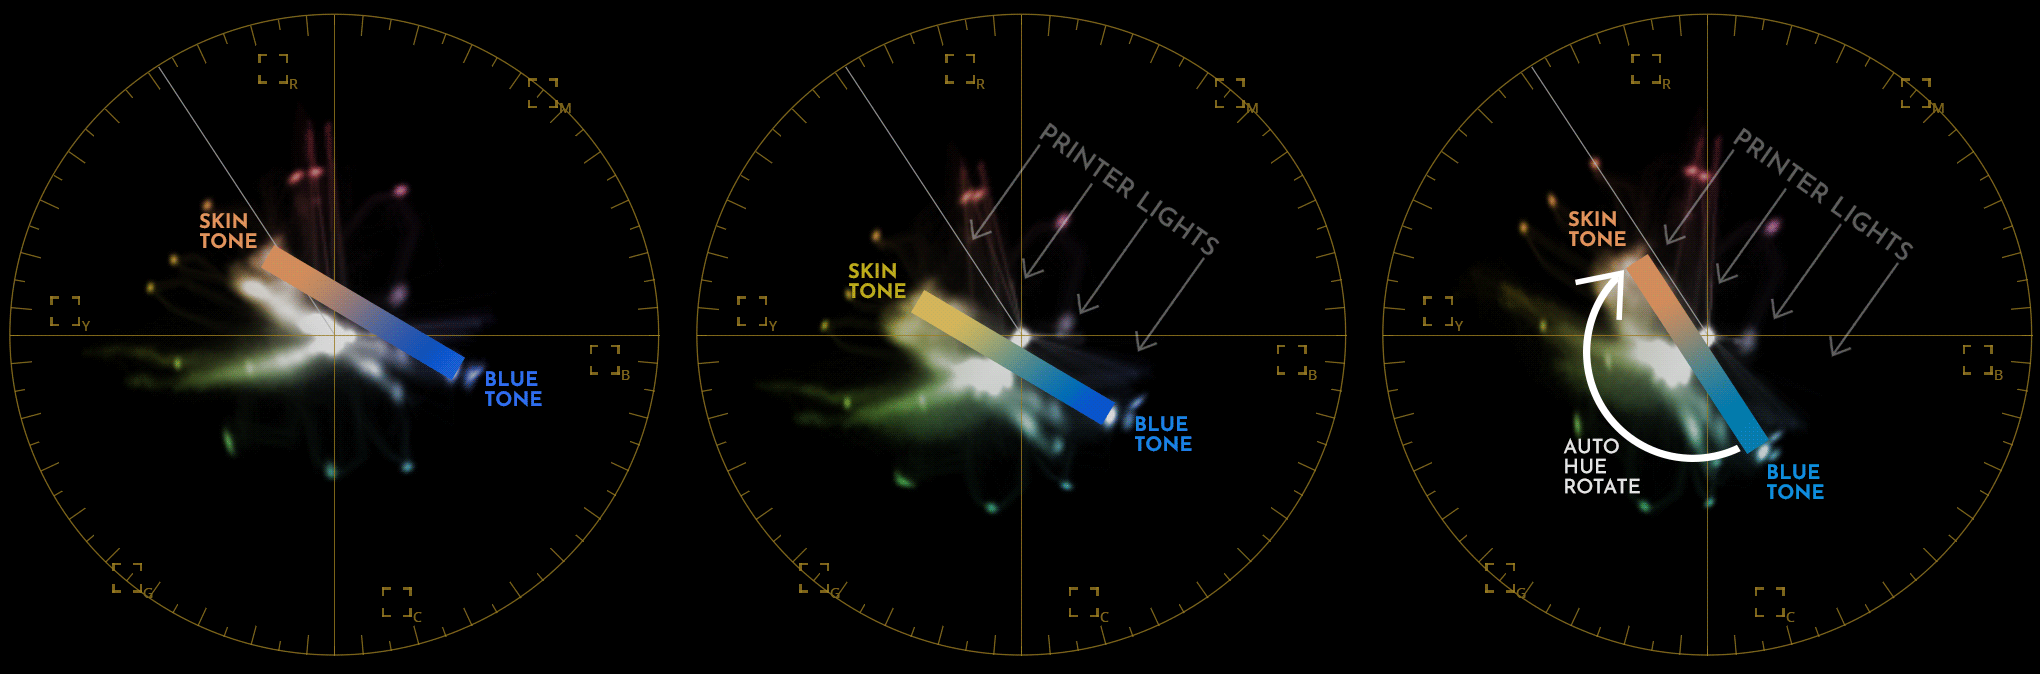
Original Image
The vectorscope shows the original footage. Skin tones sit naturally along the skin tone line, and blue areas are in their expected position. No printer light or hue adjustments have been made.
Printer Lights Adjusted
Adjusting the green/magenta printer light shifts the RGB balance of the image. This pushes all hues — including skin, blue, red, and cyan — in a new direction on the vectorscope. As a result, the skin tone drifts off the skin tone line, which is a typical outcome when using printer lights without additional hue correction.
Printer Lights + Auto Hue Rotate
With Auto Hue Rotate enabled, a global hue rotation is automatically applied based on the printer light adjustments. This helps bring the skin tones back closer to the skin tone line, preserving a more natural look. Since it’s a global shift, all hues are affected — for example, the blue tones now appear pushed toward cyan.
LOOK DEVELOPMENT
The DCTLs provide a fast and flexible approach to look development, making it easy to create a wide range of aesthetic styles. Whether you’re aiming for soft, low-contrast, vibrant visuals or a harsher, bleach-bypass-inspired look, these tools allow for quick experimentation and efficient workflow.


NODE TREE
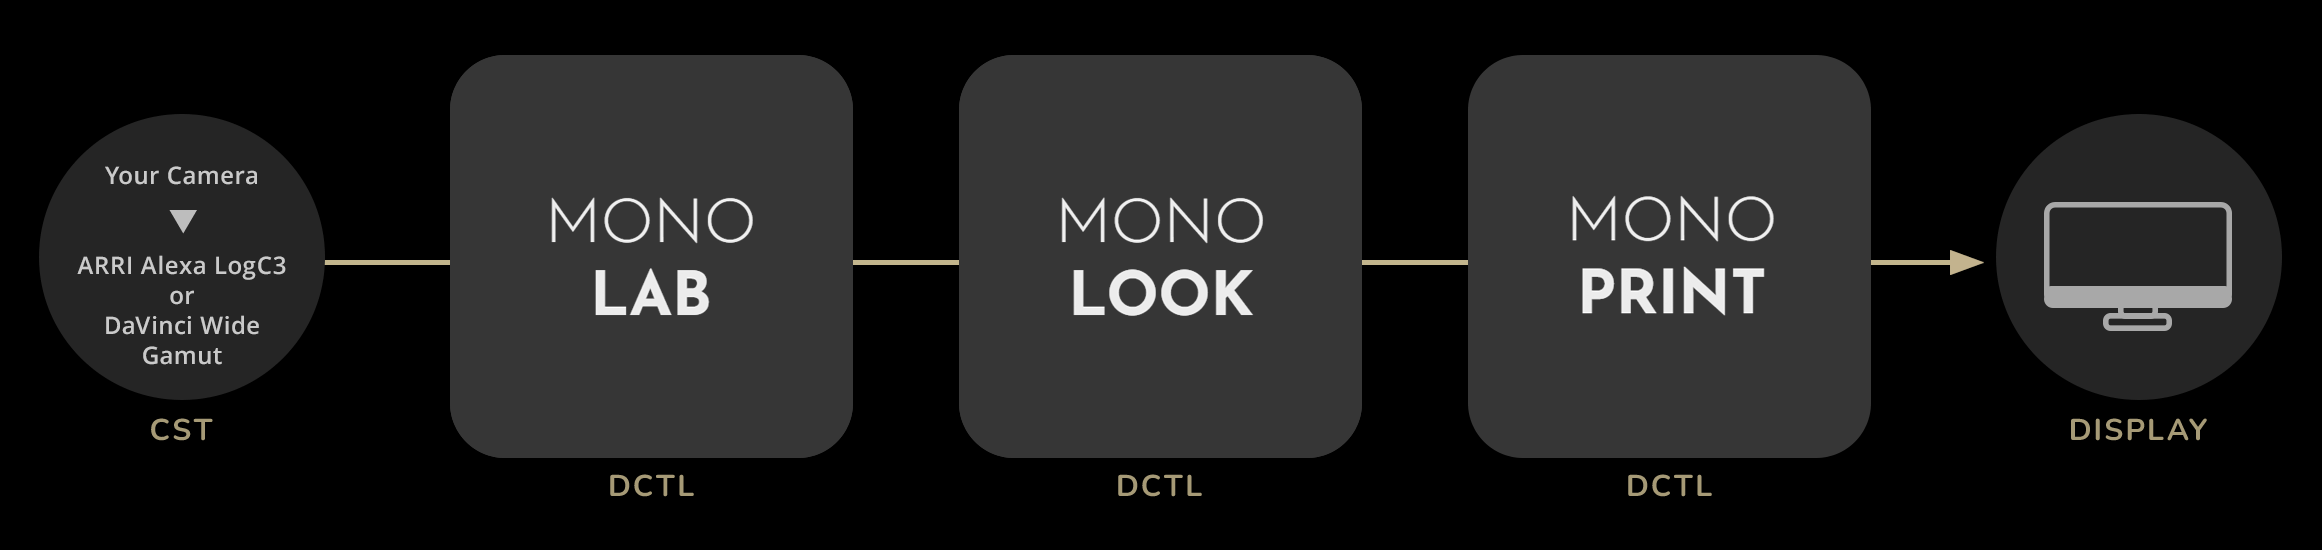
WORKFLOW
All cameras are supported. Just use a Color Space Transform (CST) to convert your footage to ARRI Alexa LogC3 or DaVinci Wide Gamut Intermediate (DWG) before applying the tools. Start with the LAB DCTL, then apply the LOOK DCTL, and finish with the PRINT DCTL. I suggest placing the PRINTER LIGHTS DCTL between LAB and LOOK, but feel free to experiment with what works best for your workflow.
This pack is fully compatible with other DCTL packs such as
Color Shift, Hue Twist, RGB Crosstalk, and RGB Split Tone.
VIDEO
YouTube: https://youtu.be/i6cKoJ14sIw
FREE DEMO VERSION
ko-fi.com / 500 KB
This version includes a watermark, displayed as a grid
of black plus signs on the image. The demo version is perfect
for users who want to explore the software’s features
and functionalities before making a purchase.

INSTALL GUIDELINES
PDF / 340 KB
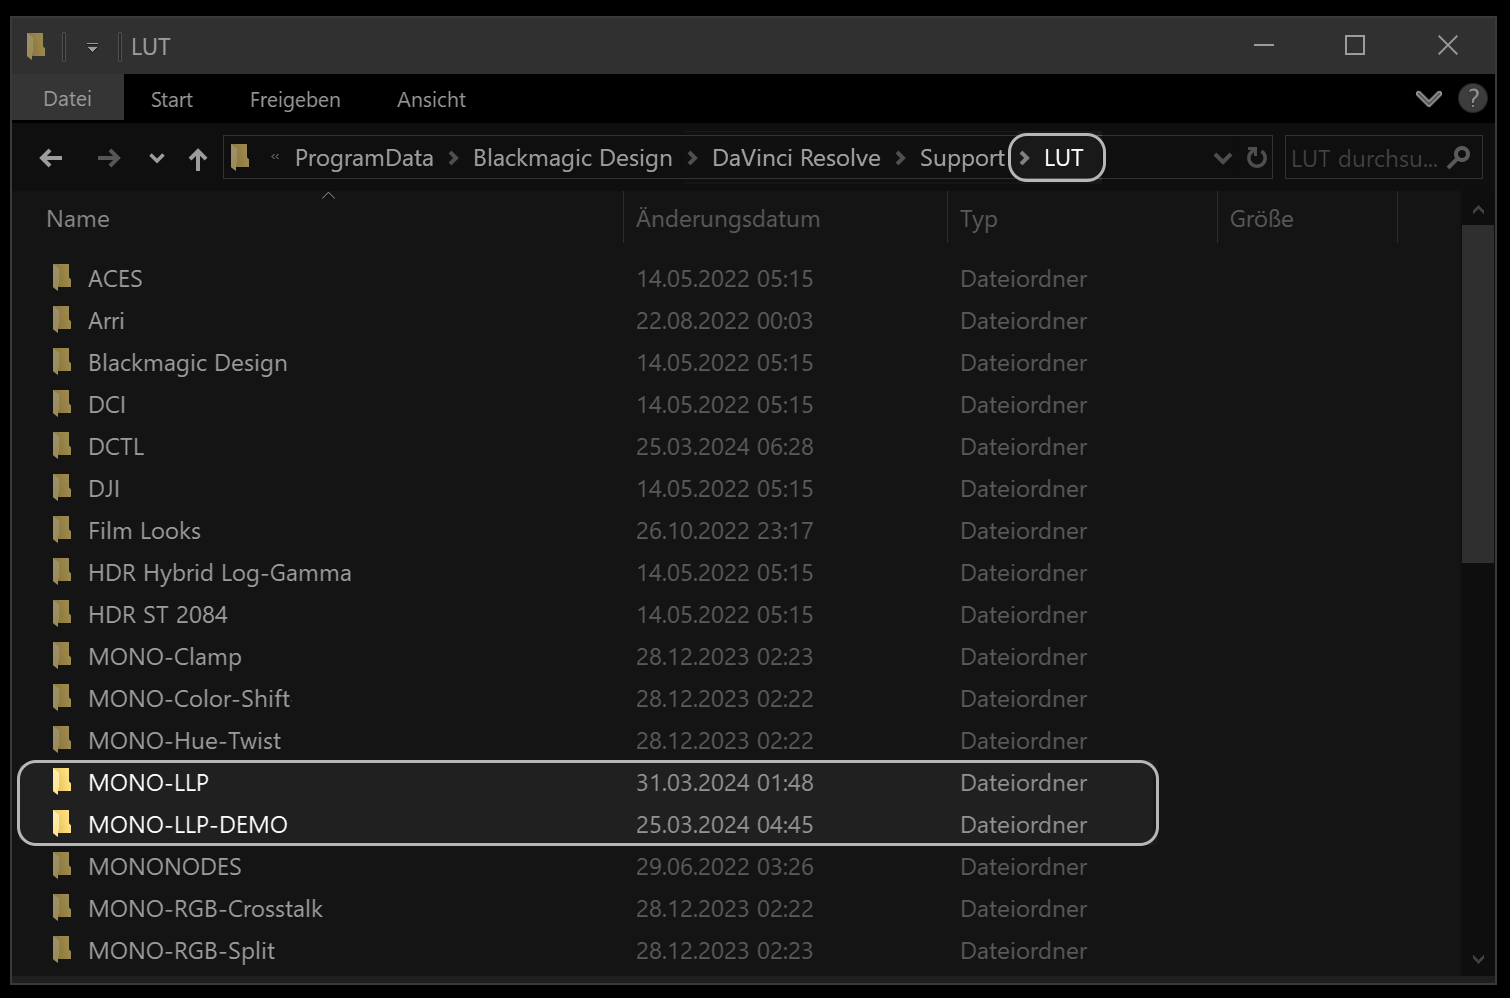
Copy the MONO-LPP folder directly into your LUT folder
(e.g., /LUT/MONO-LPP). Do not nest it inside extra subfolders
(like /LUT/DCTLS/MONONODES-LLP/MONO-LPP).
If it’s placed incorrectly, PRINT.dctle will not work.
LOOK / LAB / PRINT
FULL VERSION
One-time payment.
No subscription.
Free updates.
Format: Encrypted DCTL
-
 € 249,00
incl. 19% VAT